From the book (1979 edition):
An Analogy
...You probably have seen cartoons in the movies or on TV where on eo fthe characters -- Bugs Bunny, for example -- runs down a hallway and smashes through a closed door, leaving a Bugs Bunny-shaped hole in the door. Imagine this seeming paradox in your mind: what's left of the door is the negative space, and the innner edge of that shape is the edge of the negative space and also is the outline of the positive form (Bugs Bunny). In other words, the empty hole and the solid door share edges, and if you draw one you will have also drawn the other.
Example:
There are two mandatory drawings with this assignment, and several supplimentary ones that you are free to try.
NEGATIVE SPACE DRAWING
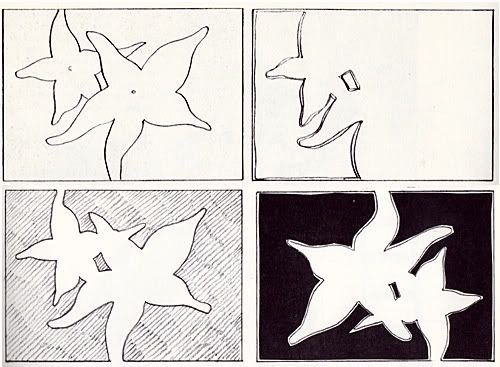
1. On a sheet of paper draw some large forms: two starfish, three pipes, musical instruments, some abstract shapes, or any other forms you wish. (Starfish example below.) These are positive forms. Be sure the positive forms touch the edges of the format in at least two places, as in the example. The spaces around the starfish are the negative spaces.
2. To reinforce the idea that, in drawing, the spaces are regarded as [/i]shapes[/i], gove over the drawing with your pencil, consciously and deliberately, heavily outlining the shapes of the spaces, including the edges of the paper as part of the negative shape/space. Go over the ouline several times, as show in the example below.
3. Now, direct your gaze at one of these outlined areas, until you can see it as a shape. This takes a little time. The left brain, confronted with a shape that has no name, takes a moment to scan for recognition. Unable to match the space up with any known thing, the left brain says, in effect, "I don't know what that is. That kind of thing isn't useful to me and if you are going to continue to look at it, you (the right hemisphere) will have to deal with it. I'm not interested." Good! That's just what we want. Keep gazing at one of the shapes, and it will come into focus as a shape.
4. Darken the negative spaces with a pencil or pen, as in the example, to further strengthen the concept of the space as a shape. Again, gaze at the shapes, one at a time, until you can perceive them.
5. Next, using scissors, cut out the negtive spaces. Picke them up. Perceive them as shapes. Turn them various ways. Then, using paste or tape, put them back together with the positive forms on a new sheet of paper, perhaps of a different color. Since the negative spaces share edges with the positive forms, when pasted back in place the nagative-space cutout pieces, reconstruct the positive form (the starfish) as well.
The point of this exercise is important. As you learned in contour drawing, the positive forms and the negative spaces share the same edges. If you draw one, you will have inadvertently drawn the other. Test that concept again in your mind. Look at some object -- the scissors, for example, that you just used. If you draw the shapes of the spaces in the handles, the edges of those negative spaces are also the inner edges of the handles themselves.
Supplimentary Exercise:
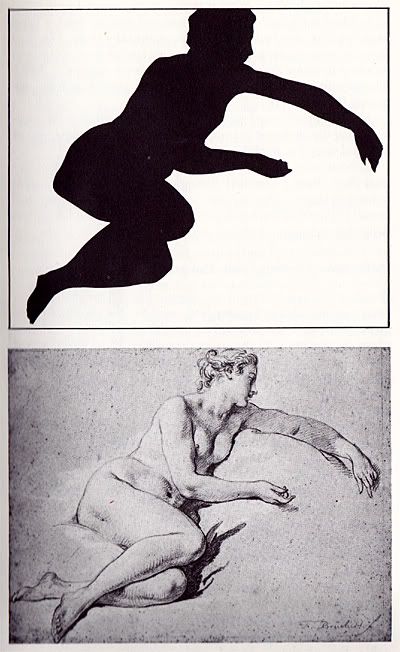
1. Practic seen negative spaces by cutting apart a magazine photograph or a photocopy of a drawing by a master artist, such as the Bousher nude in the example below. Reassemble the negative space pieces only, gluing them to a sheet of black paper. As you see, the negative spaces form the figure because they share edges with the figure.
USING A VIEWFINDER TO FORM EDGES
Construct a viewfinder as follows:
1. Take a sheet of paper, or use thin cardboard of the same size paper you use for drawing. The viewfinder must be the same format, that is the same proportional shape, as the paper you are using to draw on.
2. Draw diagonal lines from opporsite corners, crossing in the center. In the center of the paper draw a small rectangle by connecting the horizontal and vertical lines at points on the diagonals. The rectangle should be about 1" X 1 1/4". Constructed this way, the inner rectangle has the same proportions of length and width as the outer edges of the paper.
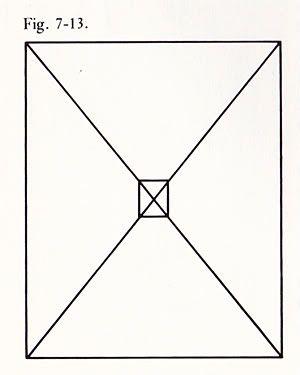
3. Next, cut the small rectangle out of the center with scissors. Hold the paper up and compare the shape of the small opening with the shape of the whole format. You can see that the two shapes are the same, and only the size is different. This perceptual aid is called a viewfinder. It will help you to perceive negative spaces by establishing an edge to the space around forms.
4. Hold up your viewfinder, close one eye (or hold a hand over one eye), and look through the opening at a chair. You may have to move the viewfinder closer to, or farther from your eyes in order to frame the chair so that you can see most of it. Move the view finder so that the chair touces the edges at at least tow points.
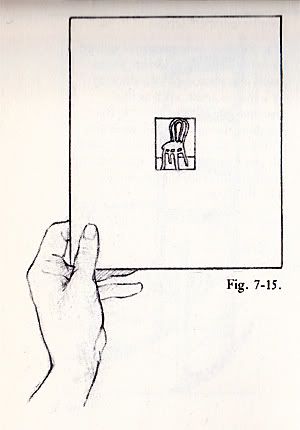
5. Now direct your gaze at one of the negative psaces surrounding the chair and wait until you can see it as a shape, just as you did with the starfish negative spaces.
6. Now imagine that the chair vanishes, and, like the door that Bugs Bunny smashed through, only the negative spaces remain as shapes. These are what you are going to draw: the negative spaces.
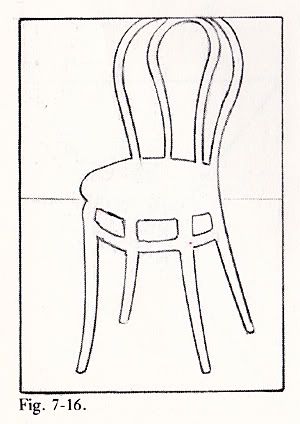
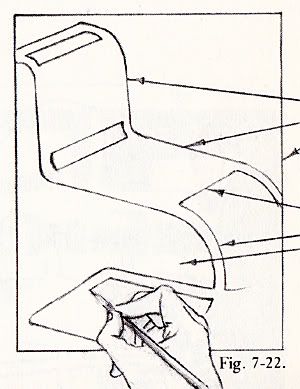
DRAWING A CHAIR
Before you begin: Read the following specific instructions.
1. Select a chair to draw. Use a real chair, not a photograph.
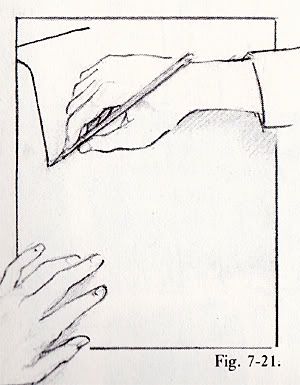
2. Hold up your viewfinder (refer back to the example above) and look through it at the chair with one eye closed, or one eye covered. (Closing one eye flattens the image by limiting vision to a monocular image, meaning a single image. Binocular vision -- with both eyes open -- produces a double image, enabling us to perceive a three-dimensional form.) If you feel uncomfortable viewing the image with one eye closed, don't worry about it. You'll do quite well with boths eyes open. It simply is a little easier to transfer a flat, one-eyed image to the flat paper. Most artists use this technique at least occasionally.
3. Frame the chair in the viewfinder so that parts of the chair touch the edges of the opening at a minimum of two points.
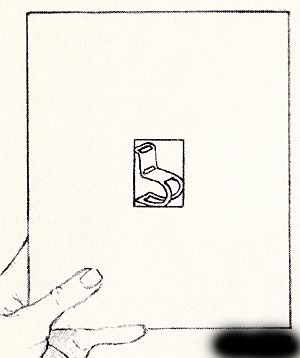
4. Gaze at the whole image as though you were memorizing it, fixing the image in your mind.
5. Next, look down at the paper you will draw on. Imagine the positive form of the chair on paper just as you saw it in the view finder.
6. Now look though the viewfinder. Gaze at the negative space on one side of the chair. Wait until you can see it as a shape. Now look down at your paper, and imagine the shape on the paper, keeping in mind that the edges of the viewfinder represent the edges of your paper.
7. Your job now is to draw only the spaces, one after another. You can draw all of the ouside spaces, and then draw the inside spaces, or vice versa. It doesn't really matter where you start, because all the sapes will fit together like a jigsaw puzzle. You don't have to figure out anything about the chair. In fact, you don't hve to think about the chair at all. And don't question why the edge of a spaces goes this way or that. Just draw it as you see it.
8. If an edges is at an angle, say to yourself, "What is the direction of that angel compared to the side of the viewfinder that represents the vertical?" Then, using the edge of the paper you're drawing on as the same vertical, draw the edge at the angle you see it.
Let me demonstrate that, because it's an important point: say that you see through the viewfinder the negative psace has an angled edge. On your draing paper, you will draw the edge of the space at the same angle compared to the edge of your paper. In other words, the edges of your viewfinder and the edges of your paper represent vertical and horizontal as you see them in the real word.
9. Further on in the drawing, guage horizontals in the same way: what is the angle, compared to the horizontal (that is, the top or bottom edges of the viewer and your drawing paper)?
10. Again, as you draw, try to take mental note of what the mode feels like -- the loss of the sense of time, the feeling of "locking on" to the image, and the wonderful sense of amazement at the beauty of perceptions. During the process you will find that the negative spaces will begin to seem interesting in their strangeness and complexity. If you have a problem with any part of the drawing, say to yourself, "What is the shape (or angle, or length of line)?" and wait until it comes into R-mod focus. Again, remind yourself that everything you need to know in order to do this drawing is right there, perfectly available to you.
Supplimentary Exercises
1. Using your viewfinder to frame the image, draw the negative spaces of a plant, preferably one with a complex shape.
2. Using your view finder to bound the form, draw the negative spaces of an ordinary household object: an eggbeater, an ironing board, a can opener.
3. Draw the negative spaces of a human figure from a photograph. Try to find a complext action pose: a football player, a ballet dancer, a construction worker, someone digging, etc. In this drawing, combine two methods: Turn the photograph upside-down and draw the negative space. The outside edge of the photo are the binding edges of the spaces and shapes. Make sure that in your drawing you use the same format, -- the same proportional shape as the photograph.
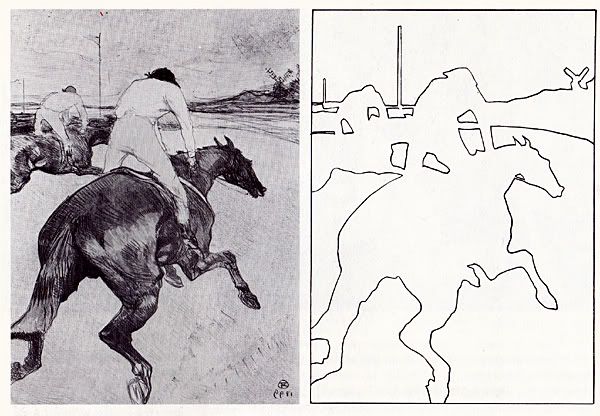
Finally I leave you with an example of how drawing negative spaces, rather than the positive forms, can help you to see proper proportions:
Work at your own pace. I will have the next assignment up by Monday. (Again, apologies for my tardiness!!)