There are two mandatory drawings for this assignment, but I will also post the supplimentary exercises should you desire more practice with this method.
From Chapter 6 (1979 edition):
We have reviewed your childhood art and the development of the set of symbols that formed your childhood language of drawing. This process paralleled the development of other symbol systems; speech, reading, writing, and arithmetic. Whereas these other symbol systems formed useful foundations for later development of verbal and computational skills, childhood drawing symbols seem to interfere with later stages of art.
Thus, the central problem of teaching realistic drawing to individuals from age ten or so onward is that the left brain seems to insist on using its memorized, stored drawing symbols when they are no longer appropriate to the task. In a sense, the left brain unfortunately continues to "think" it can draw long after the ability to process spatial, relational information has been lateralized, or shifted, to the right brain. When confronted with a drawing task, the left hemisphere comes rushing in with its verbally linked symbols; afterward, ironically, the left brain is all too ready to supply derogatory words of judgment if the drawing looks childlike or naive.
In the last chapter I said that an effective way to "turn off" your dominant left hemisphere, with its verbal, symbolic style of working, and to "turn on" your nondominant right brain, with its spatial relational style, is to present your brain with a task that the left brain either can't or won't work at. We have used Vases-Faces drawings and upside-down drawings to gain access to your R-mode. Now we'll try another, more drastic strategy that will force a stronger cognitive shift and suppress your L-mode more completely.
First we're going to start with a visualization exercise:
1. See in your mind's eye a disassembled child's jigsaw puzzle of six or eight painted pieces. The pieces will go together to form a picture of a sailboat on a lake. Imagine that the jigsaw pieces are shaped like forms: a single white piece is the sail; a red piece, the boat, etc. Imagine the rest of the pieces in your own way -- land, dock, clouds, whatever.
2. Now assemble the pieces in your imagination. See that the two edges come together and form a single line (imagine this as a precision-cut puzzle). These shared edges from contour lines. All of the pieces -- spaces (sky and water) and shapes (boat, sail, land, etc.) -- fit together to form the whole puzzle.
3. Next regard your own hand, one eye closed to flatten the image (closing one eye removes binocular depth perception). Think of your hand and the air around it as a jigsaw puzzle, the spaces (negative spaces) between the fingers sharing edges with the fingers; the shape of the flexh around each fingernail sharing an edge with the fingernail; two areas of skin sharing an edge to form a wrinkle. The whole image, made up of shapes and spaces, fits togehter like a jigsaw puzzle.
4. Now direct your eyes at one specific edge anywhere on your hand. Imagine in your mind's eye that you are drawing that edge as a single, slow, exact line on a piece of paper. As your eyes move slowly along the edge, imagine that you can simultaneously see the line being drawn, as though by some magical recording device.
PURE CONTOUR DRAWING
Before you begin: Be sure to read all of the instructions and examine all of examples given before beginning your drawing.
1. Find a place where you can be alone and uninterrupted for at least 20 minutes.
2. Set an alarm clock or timer, if you wish, for twenty minutes just before you start your drawing. (This is to remove the necessity of keeping track of time -- an L-mode function.) Or, if you have plenty of time and don't care about how long you might be drawing, omit the timer.
3. Place a piece of paper on a table and tape it down in an position that seems comfortable. Taping is necessary so that the paper won't shift about while you are drawing.
4. You are going to draw a picture of your own hand, your non-dominant hand, with your dominate hand. (If you are right-handed, you will be drawing a picture of your left hand and vice versa.) Arrange yourself so that your drawing hand, holding the pencil is ready to draw on the taped down paper.
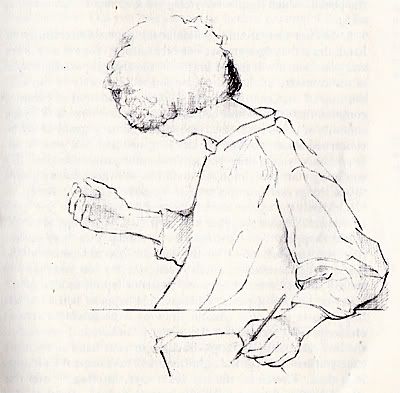
5. Face all the way around to the opposite direction, gazing at the hand you will draw. Be sure to rest the hand on some support, because you will be holding the same position for quite a long time. You are going to draw your hand without being able to see what you are drawing (see example below). Facing away from your drawing is necessary to achieve the purpose of the method: first, to focus your entire attention on the visual information out there in front; and second, to remove all attention from the drawing, which might trigger off your old symbolic patterns memorized from childhood as the "way to draw hands." You want to draw only what you see (in spatial R-mode) and not what you know (in symbolic L-mode). Turning all the way around is necessary also because the impusle to look at the drawing is almost overwhelming at first. If you draw in the normal position and say to yourself, "I just won't look," you will very likely find yourself stealing peeks out of the corner of your eye. This will reactivate the L-mode and defeat the purpose of the exercise.
6. In the turned-around position, focus your eyes on some part of your hand and perceive an edge. At the same time, place the point of your pencil on the paper (at any place well within the outside borders of the paper).
7. Very slowly, creeping a millimeter at a time, move your eyes along the edge of your hand, observing every minute variation and undulation of the edge. As your eyes move, also move your pencil point at the same slow pace on the paper, recording each slight change or variation in the edge that you observe with your eyes. Become convinced in your mind that the information originating in the observed object (your hand) is minutely and precisely perceived by your eyes and is simultaneously recorded by the pencil, which registers everything you are seeing at the moment of seeing.
8. Do not turn around to look at the paper. Observing your hand, draw the edges you see one bit at a time. Your eyes will see and your pencil will record bit by bit the changing configuration of the contour. At the same time you will be aware of the relationship of that contour to the whole configuration of complex contours that is the whole hand. You may draw outside or inside contours or move from one to the other and back again. Don't be concerned about whether the drawing will look like your hand. It probably won't, since you can't monitor proportions, etc. By confined your perceptions to small bits at a time, you can learn to see things exactly as they are, in the artist's mode of seeing.
9. Match the movement of the pencil exactly with your eye movement. One or the other may attept to speed up, but don't let that happen. You must record everything at the very instant that you see each point on the contour. Do not pause in the drawing, but continue at a slow, even pace. At first you may feel uneasy or uncomfortable: some students report sudden headaches or a sense of panic. I believe this happens when the left brain senses that pure contour drawing is presenting a serious challenge to its dominance. It realizes, I think, that if you record the intracate, complex tangle of edges in your hand at the slow pace you are drawing, the right brain will have control for a long, long time. Therefore, the left brain says, in effect, "Stop this stupid stuff right now! We don't need to look at things that closely. I've already named everything for you, even some small things like wrinkles. Now be reasonable and let's get on with something that's not so boring -- if you don't, I'll give you a headache."
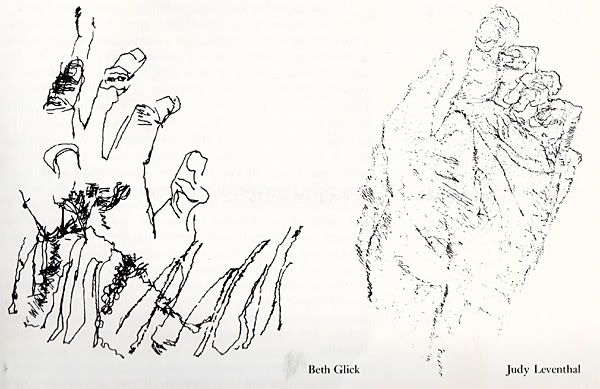
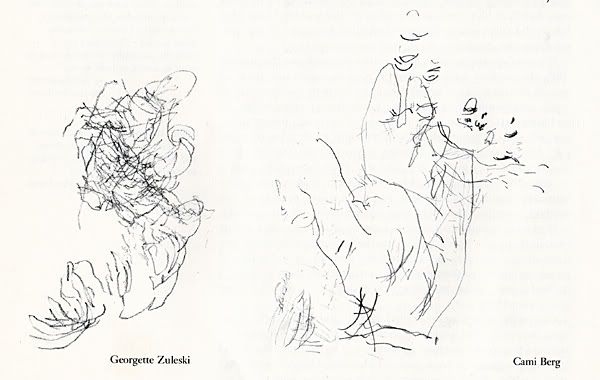
Ignore this complaining. Simply persist. As you continue to draw, the protests from the left will fade out and your mind will become quiet. You will find yourself becoming fascinated with the wondrous complexity of the thing you are seeing, and you will feel that you could go deeper and deeper into the complexity. Allow this to happen. You will have nothing to fear or be uneasy about. Your drawing will be a beautiful record of your deep perception. We are not concerned about whether the drawing looks like a hand. We want the record of your perception.
After you finish: Think back on how you felt at the beginning of the pure contour drawing compared to how you felt later, when you were deeply into the drawing. What did that later state feel like? Did you lose awareness of time passing? Did you become enamored of what you saw? When you return to the alternative state, will you recognize it?
Pure Contour Drawing Supplimentary Exercises
(not mandatory)
A). Following precisely the directions for pure contour drawing, observe and draw a complex flower such as an iris, a chrysanthemum, a rose, a geranium. Draw for 30 minutes.
B). Again, following the directions for pure contour drawing, draw a natural inanimate object such as a shell, a rock, or a piece of driftwood. Again, choose a complex object. Draw for 30 minutes.
C). Crumple a piece of paper and draw it, using pure contour drawing. If possible, take a full hour to do this drawing.
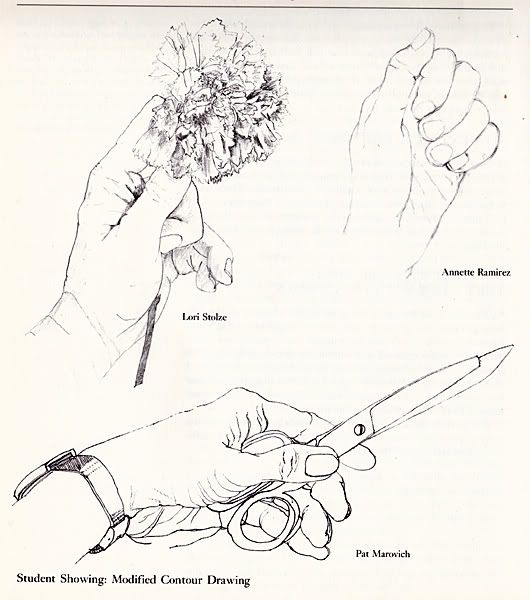
MODIFIED CONTOUR DRAWING
Before you begin: Read all of the directions.
1. Arrange for at least a half-hour of uninterrupted time.
2. Sit comfortably at a table, this time the usual position (ie -- facing the paper). Again, tape your paper to the table so that it won't slip around. you are going to draw your own hand again. Arrange your hand in a complex position -- fingers entwined, clenched, crossed, whatever. A compicated position is better for our purposes than a flat, open position because the right hemisphere seems to prefer complexity.
3. Be sure not to move either the postion of your hand, once you've started the drawing, or your head -- that is, don't tilt your head to see part of your hand that may be hidden from view. Take a single position and stay there. We want one view only, not a multiple view that would distort your drawing.
4. Gaze at your hand in preparation to draw. This will start the cognitive shift to R-mode processing. Imagine a vertical line and horizontal line next to your hand. Observe the relationship of a single angle to either vertical or horizontal. Now look at your paper and imagine the angle as though it were drawn on the paper. Find a space, perhaps between the fingers. Gaze at that space until you see the edge of the space where it meets the edge of the finger. Try to feel your mind making the cognitive shift to R-mode.
5. Fasten your eyes at any point on a contour. Check the angle in relation to vertical or horizontal. As your eyes move slowly along the contour, your pencil draws the contour on the paper at the same slow speed. Move from contour to adjacent contour. Do not draw a complete outline and then try to draw the interior forms. It's much easier to move from form to adjacent form. As in pure contur drawing, your pencil will record all of the edges, noting every slight change of direction and undulation of each contour. This is a wordless process. Do not talkt to yourself. Do not name the parts as you draw You are working with visual information only; words do not help. It's not necessary to try and figure anything out logically, because all fo the visual information is right there in front of your eyes. Concentrate on what you see, wordlessly sensing to yourself how long one part is in relation to another; how wide one part is in relation to the one you have just drawn; how steep one angle is compared to another; and where one contour appears to emerge from one you have just drawn.
6. Glance at your paper only to locate a point or to check on a relationship. About ninety percent of your drawing time should be spent with your eyes focused on the hand you are drawing, just as in the pure contour method.
7. When you come to the f-i-n-g-e-r-n-a-i-l-s (we are not naming things, remember), draw the shapes around the nails, not the nails themselves. This way you will avoid any dredged-up symbols from childhood. The left brain has no names for the shapes around the fingernails. In fact, if you have trouble with any part, shift to the next adjacent shape or two the space that shares the contour you need.
8. Finally, remember that everything you need to know about your hand in order to do your drawing -- all of the required perceptual information you need -- is right there in fornt of your eyes. Your job is simply to set down the perceptions just as you see them in marks that are records of perceptions. You don't need to think in order to do this. Since you need only sense and observe and record what you see, the drawing will seem easy and you will feel confident and relaxed and engaged, fascinated with how the parts all fit together like a perfectly fitted jigsaw puzzle.
After you finish: Reivew in your mind the drawing strategies you used, what the R-mode state of consciousness felt like, how you slipped into that state by consciously setting up conditions to facilitate the shift.
Modified Contour Drawing Supplimentary Exercises
(not mandatory)
Before you begin: Spend five or ten minutes doing a pure contour drawing of any complex object to prepare for the cognitive shift to R-mode.
A). Do a second modified contour drawing of a pinecone.
B). Do a modified contour drawing of an ordinary brow paper bag, in any condition or position you wish.
C). Do a modified contour drawing of an ordinary household object -- an eggbeater, a corkscrew, an iron, a can opener. Remember that the right hemisphere seems to prefer complexity.
D). Do a modified contour drawing of your own foot, with or without the shoe. (If you include your knee as you look down at your foot, note how wide it is relative to the width of your foot.)
After you finish: Regard your drawings done in the L-mode. Take note of the areas where the drawing indicates that you were most "locked on" to the image before your eyes. This will be reflected in the exactness of your perceptions. Try to recall your brain state at that point in your drawing.
Enjoy!